

Is your VALORANT game lagging? We can relate. The anger that comes from missing a simple shot because your game decided to stutter is unmatchable. Fortunately, we have prepared a guide to reducing VALORANT lag and stutters.
Before we begin, we would like to give a disclaimer. We are not responsible for any damage caused to your system. We included a tutorial on how to create a restore point to revert any possible damage that may be caused.
Before making any changes, we need to create a restore point so that our computer is safe in case of any issues encountered. Open the start menu and search restore point. Click create and name it something legible. Then, click create. Wait for it to complete. After it is done, you are ready to go!
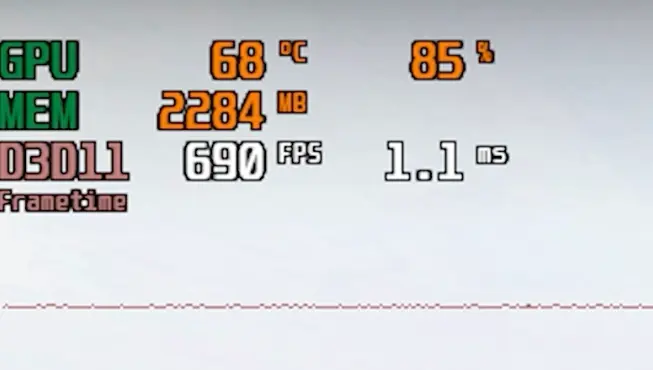
Below shows the FPS before and after the optmizations. As you can see, there is a big increase!

Both in-game settings and Windows settings play a vital role in the performance of your game. Let us start with the in-game optimisations first.
In-Game Optimizations
Without wasting any more time, let’s get into the in-game settings. Go into your VALORANT settings and make sure that show blood is turned off. Not only does this improve your performance, but this also makes fire come off an enemy’s head instead of blood which is much easier to see. Next, make sure show corpses is off. This can confuse you sometimes and reduces performance if you leave it on. Also, keeping bullet trails off increases performance but it is highly discouraged because it puts you at a disadvantage in the game.

Navigate to the Video tab and if you have Nvidia reflex, turn it to On + Boost. This will help you out with the input delay. Make sure you are on fullscreen as this reduces the input latency. Go to max FPS always and type your monitor’s refresh rate and turn on Limit FPS always. This is being done so that the system doesn’t generate more frames, get overworked and fall to a lower FPS limit.

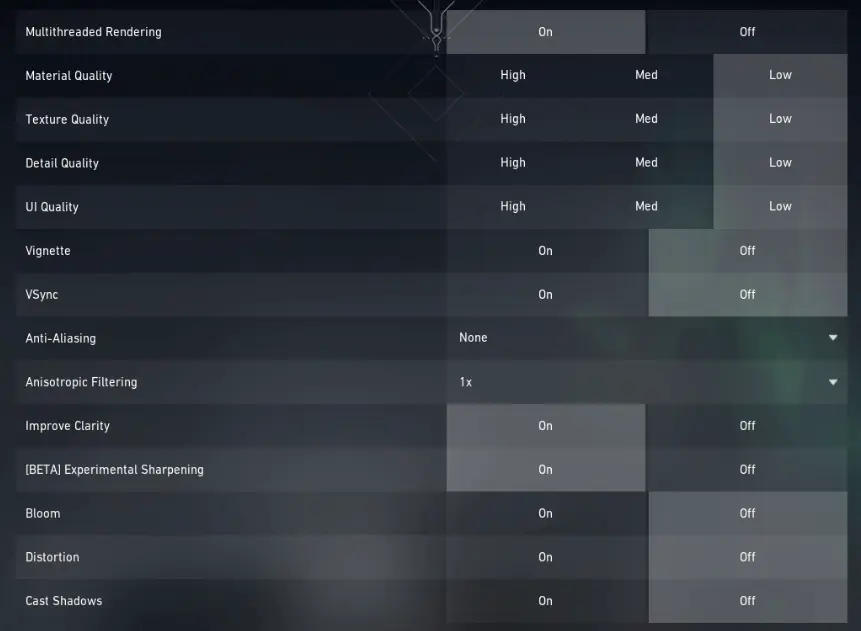
Move on to graphics quality. If you have the option for multithreaded rendering, turn it on. If you experience unbearable lag, reduce texture quality to low. It helps your PC by needing to render less content. This can be followed by bringing material quality and UI quality down to medium or low depending on your system. Antialiasing should be turned off on a slow system but can be kept on a moderate or high-end system. Turn off bloom, distortion, anisotropic filtering and cast shadows. Turn on Improve clarity and experimental sharpening. Vsync and vignette should be kept off. Vsync eats up your performance whereas vignette is just a distraction.
WINDOWS OPTIMIZATIONS
Let us get into the Windows optimisations which can have a huge impact on your game and PC performance in general.
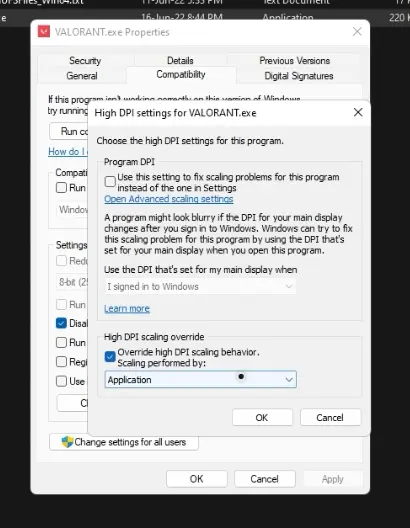
Firstly, we are going to optimize the compatibility of VALORANT on your PC. Press the Windows key and E to open the file explorer and navigate to Riot Games’ game location. Then, enter the VALORANT folder and go to the live folder. You should see VALORANT.exe there. Right-click the file and go to properties. Navigate to the compatibility tab and make sure that disable fullscreen optimisations is checked. Then, go into change High DPI settings and make sure the check box for override high dpi scaling behaviour is checked and make sure the dropdown selected the application option. Click OK, Apply and OK.
Next, we are going to optimize the Windows settings. Press the Windows Key and I to open the settings. Go into the gaming section, click on game mode and make sure it’s on. Just a quick disclaimer, if you use any clipping or recording programs, it is recommended to stop using them as it has a severe impact on your performance. However, if you need to do so, keep game mode off since it can interfere with the recording.
Next, in the same section, click on Xbox Game bar and disable any toggles. The Xbox game bar significantly affects your performance as it runs in the background sometimes recording your gameplay.
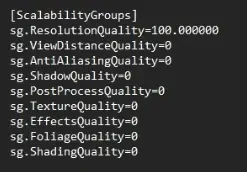
Moving on, press the Windows key and R key to open up the Run dialogue. Type appdata exactly as shown here. Go to Local, VALORANT, Saved and Config. You should see folders with a bunch of random numbers. Each of these folders corresponds to the accounts that are logged in or out of the Riot Client. Open the first folder with random numbers, go to Windows and open GameUserSettings. Scroll down to scalability groups and replace everything except sg.ResolutionQuality to 0. This will reduce the graphics beyond what the game allows you to and improves your performance. If you have multiple folders with random numbers, do the same with all of them.
Next, open the start menu and search for disk cleanup. Select the drive where VALORANT is installed and click OK. After it is done scanning, click clean up system files. This will ask you for administrator access to which you have to agree. After it is done scanning again, select everything. If you just updated Windows and don’t like it, don’t delete the Windows Update files. Uncheck the recycle bin if it has files that you want to recover. I do not have any files so I will select everything and click OK. If you did not install VALORANT on the C: drive, I recommend running disk cleanup again but for the C: drive. Follow the same procedure. In the majority of cases, the C: drive returns more junk than the other drives.
After this, close the Settings app, open your start menu and search for graphics settings and open it. If you are on Windows 10, you should see hardware-accelerated GPU scheduling. Make sure it is on. If you are on Windows 11, click the first option to change default graphics settings and you should see the same setting. Make sure it is on.
Next, open your start menu and search choose a power plan. Make sure it is on high performance. If it is not, change it. If the high-performance power plan is not available, click create a power plan, select high performance and name it whatever you want. Just be wary that if you are doing this on a laptop, it will use significantly more power. After you selected it, click Choose what the power buttons do on the left side. Now, click change settings that are currently unavailable. Make sure fast startup is turned off. This may seem contradictory but there is a legitimate reason. When you shut down your computer, it enters a hibernation state instead of completely shutting down. However, when you restart your computer, it properly turns off. This is why restarting sometimes fixes an issue but shutting it down and turning it on again does not. Unchecking this box will make your PC shut down completely every time you shut it down. Now, close out of the power plan menu.

Open the start menu and search for mouse settings. If you open the Settings app, click additional mouse settings. If you are on Windows 10, it will be on the top right and on Windows 11, it will be at the bottom of the page. Go to pointer options and make sure enhance pointer precision is unchecked. This will make your mouse go in a uniform path instead of increasing or decreasing its speed. It will take a few hours to get used to but your aim will be much better.
Once again, open the start menu and search for delivery optimisation. Make sure allow downloads from other PCs is disabled. This is ludicrously important. This feature allows other PCs or laptops running Windows 10 or above to connect to your device and use it to download updates which will severely impact performance. This should be off at all times as no one uses it.
This next step does not involve searching in the start menu but involves the task manager. Press the Control key, shift key and escape key at the same time. This should open the task manager. Navigate to startup. This menu consists of apps that may or may not start up when your computer starts up. Sure, you may need an app but not immediately. Analyze and disable anything you don’t need starting up immediately. If you do not recognize something, do not interfere with it. It may be a system app. Disable everything you don’t need running and make sure you recognize what you are modifying.
For the next optimisation, I would like to caution you to be extremely careful. Do not turn on any settings unless you know what you are doing. Press the Windows key and R key. Type msconfig. Go to boot and make the timeout 5 seconds. Check no GUI boot, click apply and ok.
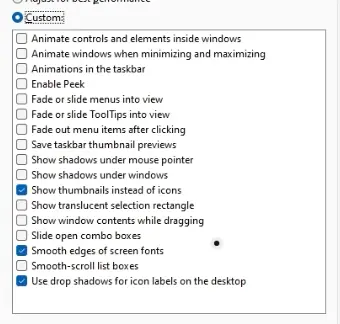
This optimisation can really help. Open the start menu and search adjust the appearance. You can copy the settings in the image below. Your Windows will look slightly worse but it disabled the visual effects which have an impact on your performance.
Press the Windows key and the I key again and go to personalisation. Go to colours and make sure that transparency effects are off. This will make Windows look bland but save GPU resources.
This next feature isn’t properly available on Windows 11 so skip to the next tip by going to the timestamp on the screen. If you are on Windows 10, press the Windows key and the I key to open the settings and open background apps. Here, uncheck any app you don’t want running in the background. This will free up a lot of memory.
If you are using an Nvidia GPU, you are incredibly lucky! You have more optimisation features. Go to your desktop. If you are on Windows 10, right-click on it and go to Nvidia control panel. If you are on Windows 11, right-click on the desktop and click show more options. Then, click Nvidia control panel. In the left menu, go to adjust image settings with preview and click use advanced 3D image settings. Then, go to Manage 3D settings. Go to CUDA GPUs and select all your GPUs. Scroll down and make sure low latency mode is on Ultra. For power management mode, make it prefer maximum performance. Finally, for OpenGL rendering GPU, select your main GPU.
This next trick uses an application called Process Lasso. In layman’s terms, Process Lasso is a program to communicate with your CPU and set priority for different applications. If you set a high priority for VALORANT, the CPU will focus more resources on VALORANT as compared to other programs or services. To download it, go to bitsum.com and click the download button. Install the app using the file downloaded. Next, open Process Lasso and VALORANT both at the same time. Find the two or three executables related to VALORANT. Hold the control key and click all of them. Right-click on the selection and hover over CPU priority, then always, then High. Do not select real-time as it may cause problems.
